




exposure on iphone
I’m Matt, the founder and CEO of Smartish. I’m a design nerd obsessed with solving unexpected needs. After years of being bogged down with a wallet and a phone at all times, I took matters into my own hands. I sketched a wallet-phone-case hybrid, handed the design to a friend, and remarked, “That’s smart.” The response was, “-ish.” That’s how we started. Today, I’m here to help you master exposure on iPhone so your photos look as sharp as our cases.
Key Takeaways
- You can adjust exposure right in the Camera app by tapping the screen and sliding the sun icon up or down.
- Locking your focus and exposure with AE/AF lock stops the camera from changing settings when you recompose your shot.
- Using manual exposure adjustments gives you more control over bright backgrounds or dark foregrounds instead of relying on auto mode.
- Practice with different lighting conditions like sunset or indoor spots to see how small exposure changes affect your photo’s mood.
- A properly exposed shot keeps details visible in both shadows and highlights without washing out your subject.
Mastering exposure on iPhone is the quickest way to stop your photos from looking like a gloomy cave or a washed-out mess. Whether you are capturing street scenes, portraits, or sunsets, knowing how to tweak brightness on the fly can rescue your shots and give you creative control without fuss. Let’s cut to the chase and get your iPhone camera working for you.
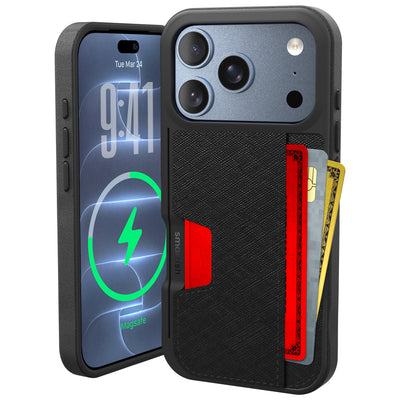
We’ll also spotlight a practical pick to keep your phone safe and stylish while you shoot: the Dancing Queen - Crossbody Wallet Case for iPhone 11 Pro Max. It’s a smart companion designed to hold your essentials and free your hands for the perfect shot. This case secures up to 5 cards plus cash, features lipgloss loops for quick access convenience, includes an adjustable crossbody strap to keep hands free, and comes with a removable wristlet. It is not compatible with wireless chargers and is not MagSafe compatible. Available colors include Stiletto Black-Gold, Stiletto Black-Silver, Bath Bomb Blue, Flavor of the Month, and Chefs Special. Some variants, like Stiletto Black-Gold and Stiletto Black-Silver for iPhone 11 Pro Max, are sold out. The price is listed as $29.99 and $34.99.
The Quick Fixes: Adjusting Exposure on Your iPhone
The Sun Slider: Quick Brightness Adjustments
When your photo looks too dark or too bright, the fastest fix is the sun slider. Tap to focus on your subject in the Camera app; a yellow box appears. Right next to it, a tiny sun icon sits on a vertical slider. Slide it up to brighten your image or down to darken it. This manual adjustment overrides the automatic exposure, letting you control how much light the camera captures.
It’s a simple tap-and-drag move that can save a photo from being unusable. For example, shooting a backlit subject? Slide down to avoid blown-out highlights. Shooting in shadow? Slide up to bring out details. You don’t have to guess or rely on auto settings that often miss the mark.
Exposure Compensation: Setting Your Default
Adjusting exposure every photo is fine, but what if you want your iPhone to remember your preference? That’s where exposure compensation comes in. You can preserve your last exposure adjustment so the camera starts with your chosen brightness level next time.
To enable this, go to Settings > Camera > Preserve Settings and toggle on Exposure Adjustment. Now your manual tweaks stick, avoiding the frustration of constantly resetting brightness. This feature is especially handy if you frequently shoot in similar lighting conditions and want consistent results without fiddling each time.
By mastering these quick fixes, you avoid the classic problem of underexposed shadows or overblown highlights. Plus, your photos get that extra pop of personality without extra gear or apps.
Locking It Down: How to Use AE/AF Lock for Consistent Shots

How to Lock Focus and Exposure
Ever notice your iPhone camera suddenly changes brightness or focus just before you snap the photo? That’s the auto-exposure and autofocus trying to help, but often they ruin your carefully crafted shot. The solution is AE/AF Lock, which freezes both focus and exposure exactly where you want them.
To activate AE/AF Lock, tap and hold on your subject in the Camera app until the yellow box pulses and the words “AE/AF Lock” appear at the top. This locks your focus and exposure settings, preventing the camera from readjusting as you move or recompose. You’ll get the exact brightness and sharpness you chose, every single time.
Stopping Auto-Exposure from Shifting Your Shot
Auto-exposure can be the sneakiest culprit behind inconsistent photos. For example, when you shift the frame to include a bright light source, your iPhone might instantly darken the entire image to compensate. AE/AF Lock stops this mid-shot meddling by holding exposure steady no matter what the scene throws at you.
This is especially useful in tricky lighting, like concerts or sunsets, where light conditions vary across the frame. Locking your exposure keeps colors and shadows consistent, so your photos look exactly how you intended. And if you change your mind, just tap anywhere on the screen to unlock and reset.
For photographers who want repeatable results and control, AE/AF Lock is a must-know tool. It transforms your iPhone from a reactive camera into a deliberate instrument, matching the creativity you bring to the moment.
And remember, while you’re busy perfecting shots, the Dancing Queen - Crossbody Wallet Case for iPhone 11 Pro Max keeps your phone protected and your essentials close, so you’re ready for anything. It’s a design that understands you’re on the move, hands full, and not here for fuss.
Behind the Lens: The iPhone Exposure Triangle Explained
Shutter Speed, ISO, and Aperture on iPhone
Exposure on iPhone, like any camera, boils down to managing three main elements: shutter speed, ISO, and aperture. These work together to decide how much light hits the sensor, shaping the final image's brightness and clarity. Shutter speed controls how long the sensor is exposed to light. A faster shutter freezes motion, while a slower shutter lets in more light but risks blur. ISO adjusts the sensor's sensitivity to light; higher ISO brightens an image but can introduce grain or noise.
Unlike traditional cameras, iPhones have a fixed aperture, meaning the lens opening size does not change. This limits one of the triangle’s usual controls but simplifies shooting for everyday users. Instead, Apple’s software manages exposure by tweaking shutter speed and ISO automatically or letting you adjust exposure compensation manually. Understanding this triangle helps you predict how your adjustments affect your photo’s look, especially when using third-party apps that unlock manual control.
Native iPhone Tools vs. Third-Party Apps
The built-in Camera app offers solid automatic exposure management combined with an easy-to-use sun slider for manual tweaks. While convenient, it does not allow direct control over shutter speed or ISO values. For photographers ready to step up their game, third-party apps like ProCam 8 or Slow Shutter Cam provide manual exposure settings. These apps let you lock shutter speed, adjust ISO independently, and even enter bulb mode for long exposures beyond the native limits.
For example, ProCam 8’s bulb mode lets you hold the shutter open as long as you want, a feature iPhone’s native app lacks. This can produce dramatic effects like light trails or silky water that require exposures longer than a few seconds. These apps also offer exposure histograms and focus peaking to give you precise control and feedback, helping you master exposure on iPhone rather than relying on guesswork or automatic adjustments alone.
| Feature | Native iPhone Camera | Third-Party Apps (e.g., ProCam 8) |
|---|---|---|
| Manual Shutter Speed | No | Yes |
| Manual ISO | No | Yes |
| Aperture Control | Fixed | Fixed (hardware limitation) |
| Bulb Mode (Long Exposure) | No | Yes |
| Exposure Compensation (Sun Slider) | Yes | Yes |
| Exposure Lock (AE/AF Lock) | Yes | Yes |
| Histogram & Focus Peaking | No | Yes |
These differences mean native iPhone tools are great for quick, reliable shots, but if you want full creative control over exposure on iPhone, third-party apps unlock a new level of precision. Whether you’re freezing motion or capturing subtle light changes, understanding the exposure triangle and picking the right tools sets you up for better photos every time. And when you’re out chasing shots, consider protecting your phone with the Dancing Queen - Crossbody Wallet Case for iPhone 11 Pro Max. It frees your hands and keeps your essentials close, so you never miss a moment trying to juggle your gear.
Capturing Motion: How to Take Long Exposure Photos on iPhone
The Live Photos Trick (Silky Water and Light Trails)
Long exposure photography creates those dreamy effects where water looks silky smooth or car lights stretch into colorful trails. With iPhones running iOS 11 or later, you can fake this effect easily using Live Photos. When you capture a Live Photo, swipe up on the image in the Photos app and select “Long Exposure.” The phone blends the frames from the 1.5 seconds before and after the shot, simulating a slow shutter speed without needing a tripod or extra apps.
This trick works on any iPhone 6s or newer and is perfect for casual shots of waterfalls, rivers, or city streets at night. While it will not match the control or duration of true long exposures, it’s an instant way to add motion blur and creative flair without fuss. Just remember to keep your phone steady while snapping the Live Photo to avoid unwanted shake.
Unlocking the 30-Second Exposure on iPhone 16 and 17
The latest iPhone 16 and 17 models push Night mode exposure times up to 30 seconds when mounted on a tripod, giving you much more light-gathering power for ultra-low-light scenes. This is a big leap from previous models limited to shorter exposures. To unlock this feature, you need to enable Night mode manually by tapping the moon icon in the Camera app and then adjusting the exposure time slider.
Keep in mind, the phone must be completely steady, ideally on a tripod, as any movement will blur the image. Holding your phone by hand will not achieve the full 30-second exposure; you’ll be limited to shorter intervals. This capability allows stunning shots of starry skies, cityscapes at night, or dim interiors with natural light effects you cannot get otherwise. For even longer exposures, apps like ProCam 8 offer bulb mode, but the native Night mode 30-second exposure is a solid option that does not require extra software.
| Scenario | Live Photos Long Exposure | iPhone 16/17 Night Mode 30-Second Exposure | Third-Party Apps (Bulb Mode) |
|---|---|---|---|
| Phone Stability | Handheld to steady | Tripod required | Tripod recommended |
| Exposure Duration | ~1.5 seconds | Up to 30 seconds | Indefinite (bulb mode) |
| Control Over Settings | Minimal | Manual exposure time slider | Full manual control |
| Best Use | Quick motion blur, casual shots | Low-light scenery, nightscapes | Creative long exposures, light painting |
Mastering these long exposure techniques adds a powerful tool to your iPhone photography toolkit. Whether you want the simplicity of Live Photos or the extended control of Night mode and third-party apps, you can capture stunning motion effects with just a little practice. And when you’re out shooting long exposures, trust the Dancing Queen - Crossbody Wallet Case for iPhone 11 Pro Max to keep your phone safe and your hands free. It’s designed to keep essentials handy so you can focus on chasing light, not fumbling with your gear.
Keep It Steady: The Key to Crisp Exposure on iPhone Shots

When mastering exposure on iPhone, one overlooked but essential factor is steadiness. The longer your exposure time, the more sensitive your shot becomes to any movement. That means a shaky hand can turn a potentially brilliant photo into a blurry mess. Whether you’re aiming for a quick brightened snap or a full 30-second exposure on the iPhone 16, maintaining a stable hold or using a support system is indispensable.
Even with Apple’s advanced image stabilization, hand tremors can cause unwanted blur, especially in low-light conditions where the camera compensates with slower shutter speeds. Tripods or stable surfaces become your best friends for longer exposures, enabling the sensor to soak up light without sacrificing sharpness. For casual shooting, resting your phone on a flat surface or wedging it against something steady can also help improve results.
For those who want to keep things mobile yet steady, accessories like gimbals or small tripods designed for smartphones provide a solid balance between flexibility and support. Without stability, even the best exposure settings will not produce the crisp, clear photos you expect. This is where the Dancing Queen - Crossbody Wallet Case for iPhone 11 Pro Max shines as a companion. By securely holding your essentials and freeing your hands, it helps you focus on steadying your shot rather than fumbling with your gear.
Using a sturdy grip paired with this crossbody case reduces the chances of accidental drops or slips while you adjust your exposure on iPhone. Since the case includes an adjustable strap and removable wristlet, it offers versatile ways to keep your phone close and stable during shooting sessions. This hands-free convenience is perfect when setting up your shot on a tripod or when you need to switch between holding your phone and other equipment.
Practically speaking, here’s what to keep in mind for steady exposure shots:
- Use a tripod or stable surface for exposures longer than a second.
- Engage Night mode on iPhone 16 or later to access up to 30-second exposures but only when your device is steady.
- Use Live Photos long exposure effects for handheld shots with minimal blur.
- Employ accessories like gimbals or grips for more control when moving.
- Keep your phone secure with a case like the Dancing Queen - Crossbody Wallet Case for iPhone 11 Pro Max to avoid distractions from drops or slips.
Exposure on iPhone is not just about adjusting brightness or shutter speed; it’s also about controlling the physical environment around your shot. Stability is the foundation for sharp, well-exposed photos in any lighting. Without it, your efforts tweaking settings can be wasted on blurry images.
In essence, steady hands or steady gear are the unseen heroes behind every successful exposure on iPhone. Combine this with manual exposure adjustments and locking features, and you’re well on your way to capturing stunning photos that stand out for their clarity and brightness. The right case and accessories keep your phone safe and your hands free, letting you concentrate on the shot instead of juggling your gear. That’s smart shooting, and it’s right at your fingertips.
References
Frequently Asked Questions
What does exposure mean on an iPhone?
Exposure on iPhone is the amount of light that reaches the camera sensor to create your photo. It decides whether your image looks too dark, too bright, or just right. You control it by adjusting the sun slider in the camera app to brighten or darken the shot.
What should my exposure be set to on my iPhone?
The best exposure setting on your iPhone depends on your scene and what you want to capture. For a balanced photo, start by tapping your subject to let the camera set auto exposure, then adjust the sun slider up or down until the highlights and shadows look natural. Use exposure compensation in Settings to keep your preferred brightness level consistent.
How do I get the 3 second exposure on my iPhone camera?
To get a 3 second exposure on your iPhone, use the Live Photo feature and convert it to a Long Exposure effect. Take a Live Photo of a moving subject like flowing water, then swipe up on the photo and select the Long Exposure option. This creates a smooth, blurred motion effect without needing a special camera app.
Why is my exposure so high on my iPhone?
If your exposure is too high and your photos look washed out, your iPhone's auto exposure is likely overcompensating for a bright background or light source. You can fix this by tapping on a darker part of the frame to rebalance exposure, then sliding the sun icon down. Using AE/AF Lock also prevents the camera from automatically increasing exposure when you recompose.
What exposure is best for an iPhone?
There is no single best exposure for all shots on an iPhone, but a good rule is to avoid blowing out highlights and crushing shadows. For most scenes, aim for a balanced exposure where details are visible in both bright and dark areas. Tap your subject and use the sun slider to fine-tune brightness until the image looks natural.
How do I use AE/AF Lock to control exposure on my iPhone?
To lock exposure and focus on your iPhone, tap and hold on your subject in the camera app until you see AE/AF Lock at the top of the screen. This freezes both the brightness and focus so they don't change when you move the camera. It is perfect for tricky lighting like concerts or sunsets where you want consistent results.